HOW TO CREATE CUSTOM SHAPES MadeWithBalloons And Rouse Matrix Balloon Grids
THE BASIC PROCESS for producing a custom shaped logo MadeWithBalloons™ is simple.
(1) Sketch It(2) Load It
(3) Trim It
Some logos are certainly more complex and difficult to produce than others, but the basic process is straightforward. You can see that in our example today shared with us by Jill Shortreed from the Charleston Balloon Company. The Charleston Balloon Company does some fine balloon decorating in Charleston South Carolina, USA. Visit them at http://charlestonballooncompany.com .
.
(1) SKETCH IT
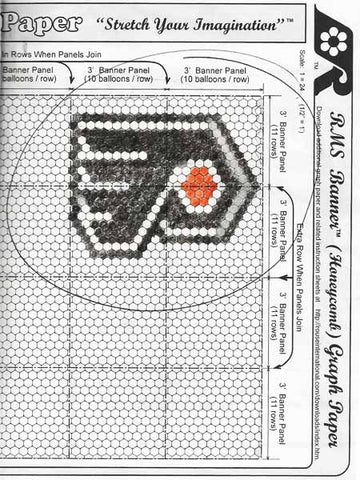
The first step is to sketch a balloon layout based on the original logo. The Philadelphia Flyers logo is shown below followed by the Charleston Balloon Company sketch.

In this case. they worked to keep the design within the borders of four of the Rouse Matrix™ Banner panels. Each panel is about 3' by 3'. Their design gives them a finished logo about 6' wide and 5' tall.
You can download the same RMS™ Banner graph paper to plan designs of your own. If you decide to build your design, you may order the RMS™ Banners online from the RMS™ Store.
.
(2) LOAD IT

Stretch open the RMS balloon frames & load balloons according to your layout.
The second step is to load balloons into the frame in the same pattern as your layout sketch.
Currently, the most common (Classic) way of loading balloons is to tie balloons in pairs and to load each balloon of a pair into an adjacent opening as illustrated in the animation to the right. There are other loading methods that you may find useful as well. Watch for other articles about options for loading balloons.
(3) TRIM IT

The third step is to trim off the excess Matrix around the balloons that form your design. Just be sure to protect the portions of the Matrix that touch and immediately surround the balloons.
You can do your cutting with standard scissors.
If you should cut one of the straps in the wrong place, you can make repairs by (1) Place the cut ends back together. (2) Use a standard office stapler to staple twice across the joint. (3) Make sure the ends of the staples curl under and in toward each other. (4) This should hold without popping balloons, but you may wrap the stapled joint in clear tape for extra protection and a smoother finish.
.
YOUR TURN
.Give it a try for yourself."MadeWithBalloons" "JustRouseIt"
____________________________________________________

